Table of Contents
- What Is Pantry Inventory Management?
- Why Pantry Inventory Matters for Your Household
- Step 1: Take a Complete Pantry Inventory List
- Step 2: Organize Into Categories and Storage Zones
- Step 3: Implement FIFO Pantry Rotation
- Step 4: Choose Your Tracking System: Paper, Spreadsheet, or App
- Step 5: Establish a Pantry Restocking Checklist and Routine
- Step 6: Use Your Pantry Inventory to Plan Meals and Reduce Waste
- Common Mistakes to Avoid
- Key Takeaways
- Frequently Asked Questions
Last Updated: October 21, 2026
What Is Pantry Inventory Management?
When you manage your pantry inventory efficiently, you reduce duplicate purchases, use ingredients before they spoil, and build meals from what’s already there.
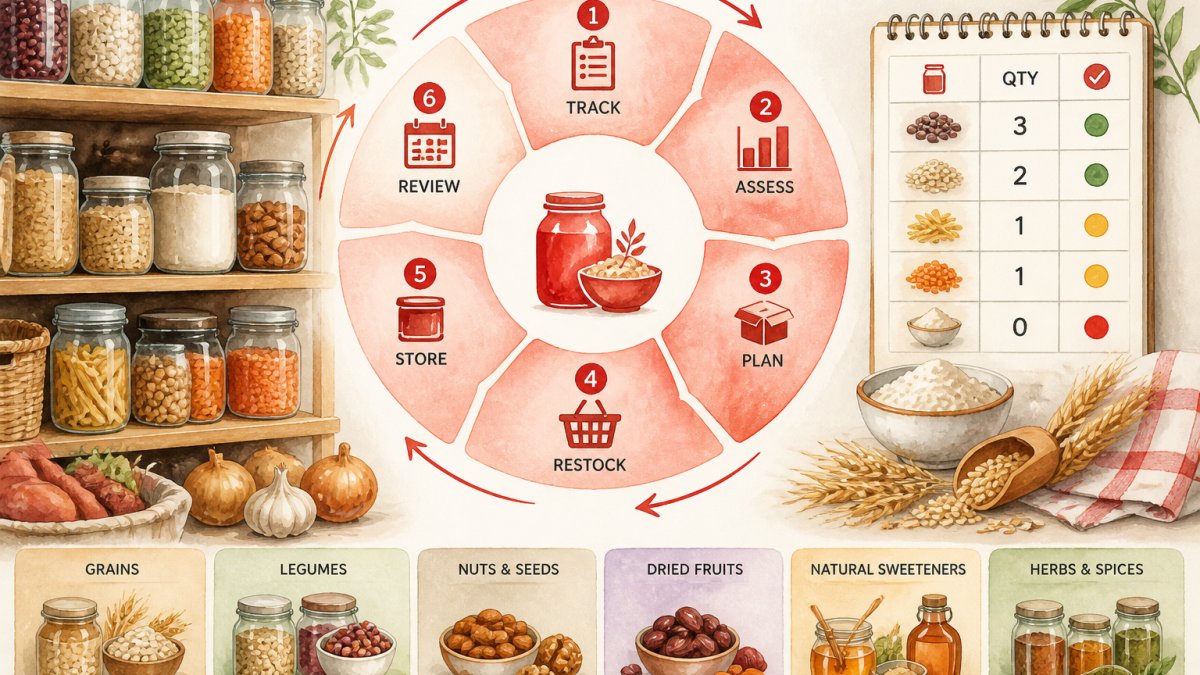
The core idea: capture your inventory, organize it, keep it current, and use it to plan. Most households skip this step and end up with expired items and wasted food.
Why Pantry Inventory Matters for Your Household
Knowing what you have prevents waste, you use items before they expire. A pantry inventory efficiently managed also saves shopping time, since you stop buying duplicates and know exactly what you need. Meal planning becomes easier too: when you know your ingredients, you can plan recipes around what you already own.
Here’s what an organized pantry gives you:
- Reduced food waste and spoilage
- Fewer impulse purchases at the store
- Faster meal planning and cooking
- Better use of bulk purchases and superfoods
- Peace of mind knowing what you have
Step 1: Take a Complete Pantry Inventory List
Open every cabinet, drawer, and shelf, check the freezer and refrigerator, and write down or photograph each item.
Capture Quantities and Expiration Dates
For each item, record:
- Item name (be specific: “organic quinoa” not just “grain”)
- Quantity (how many boxes, jars, or pounds)
- Location (which shelf, which cabinet)
- Expiration or best-by date (check the label)
Don’t estimate, count. Three boxes of pasta means three; a half-full jar gets noted. Accuracy matters when tracking what to use first. Expiration dates are critical for food safety: check every package, record the date or photograph the label, and move items nearing expiration to your “use first” zone.
Record Storage Location and Condition
Note where each item lives, organic herbs in a dark cupboard on the second shelf are easy to find next time. Also note condition: open or sealed, damaged container, original packaging or airtight containers. These details help you assess shelf life and freshness.
Step 2: Organize Into Categories and Storage Zones
Group items by type and use frequency to make restocking easier and spot low stock.
Group by Food Type and Use Frequency
Common categories include:
- Grains and flours (rice, pasta, oats, quinoa)
- Legumes and beans (dried or canned)
- Canned vegetables and fruits
- Oils and vinegars
- Spices and seasonings
- Nuts and seeds
- Superfoods (chia, hemp, nutritional yeast)
- Baking supplies (sugar, baking powder, vanilla)
- Herbal teas and remedies
Within each category, separate items you use weekly from those you use monthly or less. This makes it easy to see what needs restocking soon.
Designate Zones for Dry Goods, Canned Items, and Freezer Stock
Create physical zones: frequently used items at eye level, heavier canned goods on lower shelves, less-used items up high. For the freezer, designate sections for proteins, vegetables, and prepared meals, and keep a separate list since frozen items are harder to see.
Step 3: Implement FIFO Pantry Rotation
FIFO stands for “first in, first out.” Older items go in front. Newer purchases go in back. This ensures you use older stock before it expires.
Position Older Items Forward
When you unpack groceries, move older items to the front and place new items behind them. Arrange dated items by date, earliest in front, especially important for herbs, spices, and refrigerated items.
Label and Date New Purchases
When you buy bulk items or transfer products to storage containers, label them with purchase and expiration dates. For bulk grains, superfoods, and herbs, label the airtight container with the date opened and when it should be used by.
Step 4: Choose Your Tracking System: Paper, Spreadsheet, or App
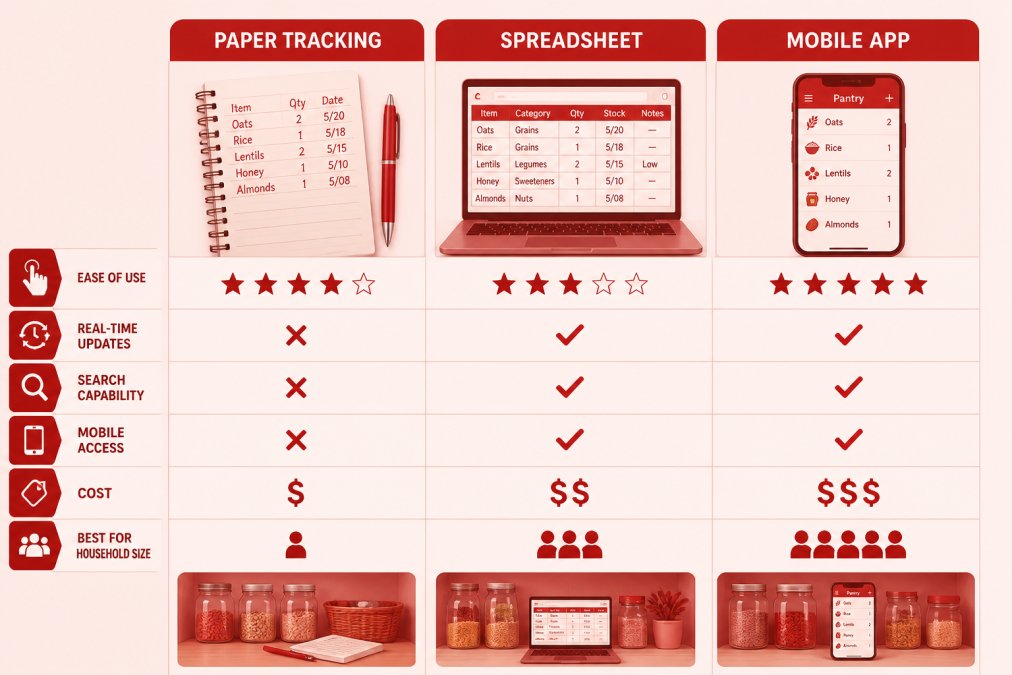
The right system depends on household size, shopping frequency, and how much effort you’ll realistically sustain, the system you actually update beats the perfect system you abandon.
A Simple Decision Guide
Use these questions to narrow your options:
- How many people are in your household? One or two people usually do well with paper or a simple spreadsheet. Three or more often benefit from a shared digital system so everyone sees the same list.
- How often do you shop? Weekly shoppers can get by with a paper checklist. Bulk buyers and infrequent shoppers need quantity tracking, which favors a spreadsheet or app.
- Do you cook from a meal plan? If yes, a spreadsheet that links ingredients to meals saves time. If you cook spontaneously, a quick photo-based app may fit better.
- How much time will you give this weekly? Be honest. Paper takes about 5 minutes. A spreadsheet takes 10 to 15 minutes once set up. An app takes 5 to 10 minutes after the learning curve.
- Do you need to share the list? Shared households and caregivers should choose a system that syncs across devices.
Paper Checklist for Simple Households
A printed checklist requires no technology: write down categories and items, check them off as you use them, and update weekly.
Pros: No technology needed; quick to update; easy to take to the store; low cost.
Cons: Can get messy or lost; hard to search or analyze; no backup if damaged.
Best for: Small households, minimal pantries, and anyone who dislikes screens in the kitchen.
Spreadsheet for Detailed Tracking and Analysis
Pros: Flexible and customizable; can track costs and trends; searchable and sortable; works on any device with internet.
Cons: Takes more time to set up and maintain; requires manual entry; not as fast to update on the go.
Best for: Bulk buyers, families, and anyone who wants to analyze spending or plan meals from a single sheet.
Mobile App for Real-Time Updates
Pros: Update from anywhere; photo-based entry is fast; automatic expiration alerts; syncs across devices.
Cons: Requires a smartphone; some apps charge a subscription; takes time to learn the interface.
Best for: Busy households, shared kitchens, and anyone who shops mid-week and needs to check stock from the store.
A Worked Example: Filling In a Starter Tracker
Here is how a simple spreadsheet row looks for one item:
| Item | Quantity | Location | Opened | Best By | Use First? |
|---|---|---|---|---|---|
| Rolled oats | 2 lb bag, unopened | Top shelf, bin 2 | , | 2027-03-01 | No |
| Chia seeds | Half-full jar | Spice drawer | 2026-09-10 | 2026-12-10 | Yes |
| Canned chickpeas | 4 cans | Lower shelf, left | , | 2028-01-15 | No |
Start with the simplest system that covers your needs, then upgrade only when it fails you. Many households begin with paper and move to a spreadsheet once they start buying in bulk.
Step 5: Establish a Pantry Restocking Checklist and Routine
Consistency keeps your system working. Aim for a repeatable cadence: a short weekly review, a deeper monthly audit, and a few simple measures to confirm it’s helping.
The Weekly Review (10 Minutes)
Set a recurring time, such as Sunday evening before you plan the week’s meals. Work through this checklist:
- Scan the use-first zone. Note anything nearing its best-by date and plan a meal around it.
- Check low-stock items. Compare what you see against your tracker and add gaps to the shopping list.
- Check fresh items. Look for wilting herbs, softening produce, or opened packages that need using.
- Update the tracker. Mark what you used and what you bought since the last review.
- Write the shopping list. Include only what you actually need.
The Monthly Audit (30 to 45 Minutes)
Once a month, do a deeper review:
- Check every expiration and best-by date. Move anything close to its date into the use-first zone.
- Look for forgotten items. Identify anything you have not used in a month and decide whether to plan a meal around it or remove it.
- Verify quantities. Recount a sample of categories rather than trusting the tracker blindly; small drifts add up.
- Check storage condition. Look for damaged packaging, loose lids, or items that should move to airtight containers.
- Refresh the tracker. Update quantities, locations, and dates, and note any categories that are overstocked.
- Adjust the shopping plan. Use what you have before buying more of the same category.
This monthly rhythm keeps your pantry inventory efficiently managed and prevents surprises.
Simple Measures to Know It Is Working
You don’t need complex analytics. Track a few plain numbers monthly: items discarded (a falling number is progress), duplicate purchases, inventory accuracy via a shelf spot-check, and time spent (if weekly reviews creep past 15 minutes, simplify). These turn “I think it’s working” into something you can see.
Don’t let your tracking system become a burden. If it takes more than 15 minutes a week, simplify it. A system you actually use beats a perfect system you abandon.
A sustainable routine is short and repeatable: 10 minutes weekly, 30 to 45 minutes monthly, and a handful of simple measures to confirm the system is reducing waste and duplicate purchases.
Step 6: Use Your Pantry Inventory to Plan Meals and Reduce Waste
Your inventory is a planning tool, before you shop or cook, check what you have. This aligns with Allstarhealth’s mission to help you build a nutritious, natural food supply, using quality ingredients intentionally.
A simple routine:
- Check your inventory for items expiring soon
- Search for recipes using those ingredients
- Plan your meals around them
- Shop only for what you’re missing
- Update your inventory after cooking
This cycle turns your pantry into an active tool, not just a storage space.
Common Mistakes to Avoid
Overbuying without tracking. Bulk buying without a system leads to forgotten purchases and waste, always track what you buy.
Ignoring expiration dates. Check dates regularly and use older stock first.
Storing items poorly. Transfer bulk purchases to labeled airtight containers; poor storage shortens shelf life.
Skipping the weekly check. A system only works if you use it, commit to a quick weekly review.
Take photos of your pantry before and after organizing. Visual progress motivates you to maintain the system.
Key Takeaways
- Pantry inventory management is tracking what you have, where it’s stored, and when it expires
- Start by capturing everything: item name, quantity, location, and expiration date
- Organize into categories and create physical zones for easy access
- Use FIFO rotation: older items in front, newer items in back
- Choose a tracking system that fits your household: paper, spreadsheet, or app
- Establish a weekly 10-minute review and monthly audit routine
- Use your inventory to plan meals and reduce waste
Managing your pantry inventory efficiently saves time, money, and reduces waste. It transforms your pantry from a cluttered storage space into an organized tool for better eating and smarter shopping.
Frequently Asked Questions
How often should I update my pantry inventory?
Review your pantry inventory weekly to catch items running low and identify expiring stock. Conduct a full audit and restock monthly. Weekly reviews take 10-15 minutes and prevent duplicate purchases and food waste. Monthly audits help you spot patterns in what you use most and adjust restocking accordingly.
What’s the best pantry inventory spreadsheet setup for beginners?
Start with three columns: Item Name, Quantity, and Expiration Date. Add a fourth column for Location if your pantry is large. Use simple formulas to sort by expiration date first. This pantry inventory spreadsheet approach takes 20 minutes to set up and requires no advanced skills. You can expand it later with categories, cost tracking, or reorder points.
How does FIFO pantry rotation actually prevent food waste?
FIFO (First In, First Out) means older items sit forward on shelves so you use them before newer stock. This pantry rotation method prevents items from being forgotten at the back and expiring unused. When combined with expiration date labels, FIFO ensures you consume food at peak freshness and helps reduce spoilage in most households.
What should I include in a pantry restocking checklist?
Your pantry restocking checklist should list staples you buy regularly, minimum quantities for each item, and when to reorder. Include dry goods, canned items, freezer essentials, and any specialty ingredients you use often. Check this checklist during your monthly audit to identify gaps. This prevents emergency shopping trips and ensures you always have ingredients for planned meals.
At Allstarhealth, we help you build a nutritious, natural food supply through quality organic and bulk pantry staples. When you combine our curated selection of superfoods and whole grains with a solid inventory system, you’re set up for success. Start tracking your pantry today. Get started with Allstarhealth and discover how a well-managed pantry supports your wellness goals.